Ice cream tiramisu cake- no.1 garden party recipe
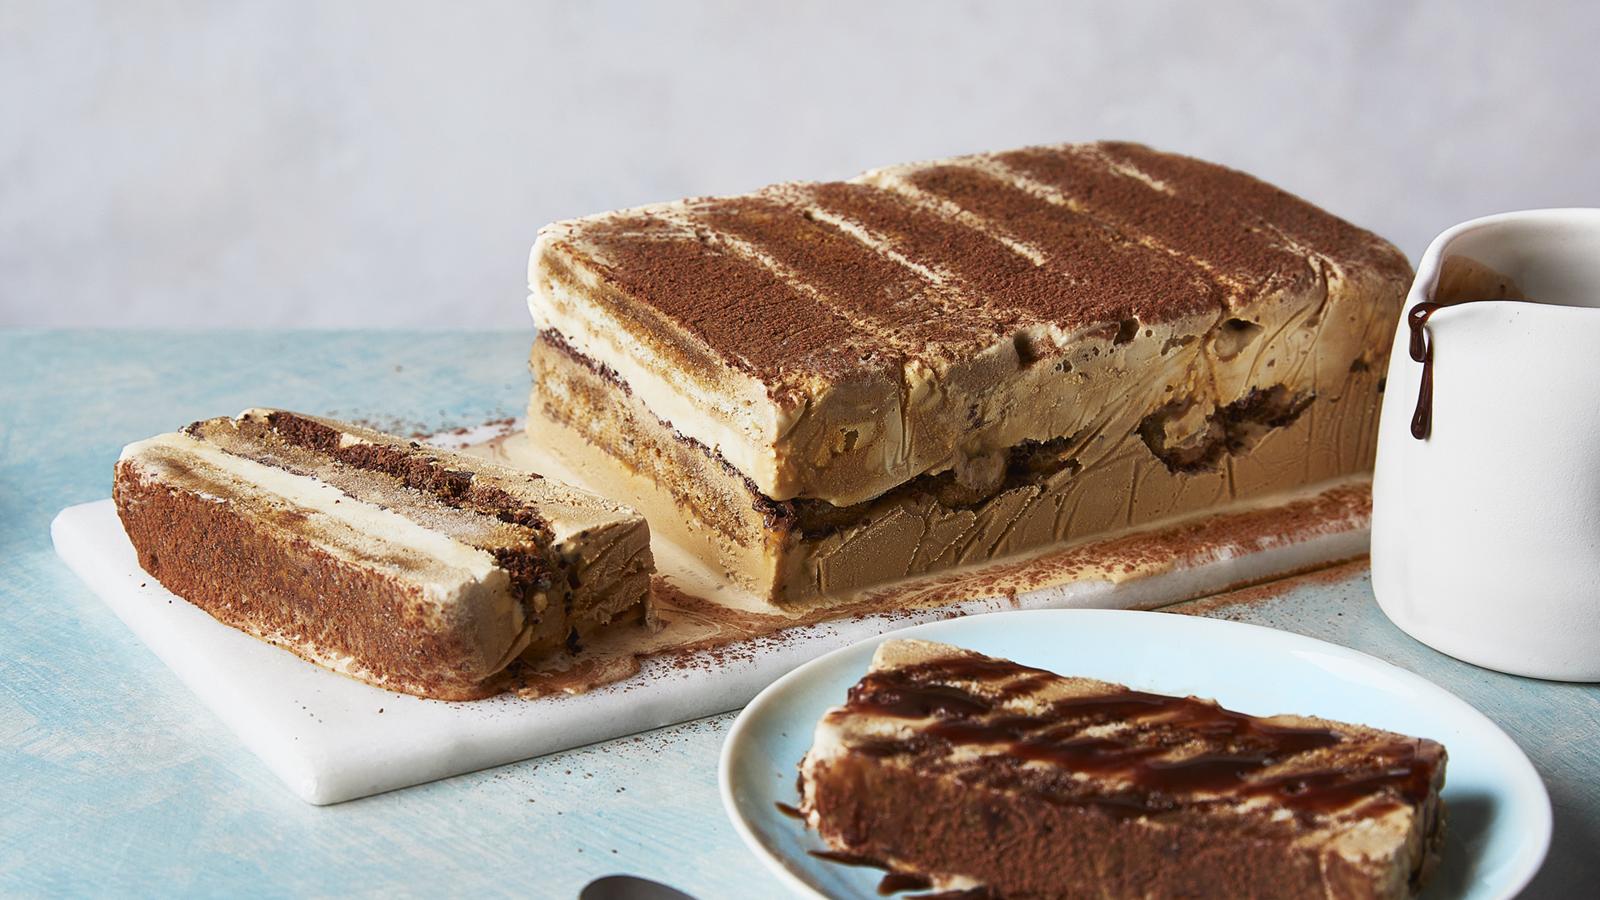
This is the sort of dessert that earns its place at the centre of the table at summer gatherings, garden parties, barbecues, picnics, or any celebration where you want something that feels special but doesn’t keep you stuck in the kitchen. Because there’s no cooking involved, it’s refreshingly simple to put together, and at around 2 hours total preparation time (including chilling), it fits easily into a busy day while still delivering a show-stopping result. Once it’s in the freezer, it’s completely stress-free - ready and waiting whenever you need it.
It’s also incredibly practical for entertaining: you can make it well in advance, it slices beautifully straight from the freezer, and it holds its shape while still melting into a creamy, indulgent finish on the plate. All you need is a 900g/2lb loaf tin, ideally with straight sides, to achieve those satisfying, bakery-style layers. Easy, reliable, and genuinely delicious, it’s the kind of summer dessert you’ll end up making again and again because it just works every single time.
Ice cream tiramisu cake- ingredient list!
5 fl oz/150 ml of espresso coffee
Two tablespoons of coffee liqueur or Marsala wine
18 fl oz/500 ml of salted caramel ice cream
Sponge fingers weighing 200g/7oz
Three tablespoons of coarsely shredded chocolate
Coffee ice cream, 750ml/26fl oz
Four tablespoons of caramel (like Carnation caramel)
One tablespoon of cocoa powder
chocolate sauce for serving
Ice cream tiramisu cake- step by step instruction guide!
Step 1
Line a 900g/2lb loaf tin with cling film, making sure you leave plenty of overhang so you can easily lift the cake out later. Press the cling film neatly into the corners to help create smooth, clean edges once frozen. In a deep plate, mix the espresso with the Marsala or coffee liqueur until well combined. This will form your rich, aromatic soaking liquid for the sponge fingers, adding a deep coffee flavour with a gentle boozy warmth if you’re using liqueur.
Step 2
Remove the caramel ice cream from the freezer and leave it at room temperature for 10-15 minutes, just until it softens enough to become spreadable but is still nicely cold and thick. You want it soft, not melted, so it holds its structure when layered. Meanwhile, take your sponge fingers and, one at a time, briefly dip half of them into the espresso and Marsala (or coffee liqueur) mixture. Don’t soak them for too long-just a quick dip is enough so they absorb flavour without becoming soggy. Arrange the dipped sponge fingers neatly in the bottom of the lined loaf tin, fitting them snugly together to form an even base. Depending on the shape of your tin, you may need to trim a few pieces so they sit flat and cover the base evenly.
Step 3
Once your base layer is complete, spoon over the softened caramel ice cream. Work relatively quickly so it doesn’t melt too much, and spread it out gently and evenly using a palette knife or the back of a spoon, making sure it reaches right into the corners and forms a smooth, level layer. This caramel layer adds a rich, buttery sweetness that balances beautifully with the coffee-soaked sponge beneath it, setting the stage for the next indulgent layer.
Step 4
Scatter the grated chocolate evenly over the caramel ice cream layer, letting it fall lightly across the surface so every slice will have little flecks of chocolate running through it. This adds a subtle bitterness and texture that cuts through the sweetness of the caramel and brings everything together beautifully. Place the loaf tin in the freezer for 20 minutes to allow the layer to firm up slightly and set enough to support the next addition. This short chill is key to keeping your layers distinct and clean when you build the cake.
Step 5
Meanwhile, remove the coffee ice cream from the freezer and leave it at room temperature for 10-15 minutes, just until it softens slightly and becomes easy to spread. You’re looking for a consistency that is pliable and creamy, not melted, so it can glide over the chocolate layer without disturbing it underneath.
Step 6
Dip the remaining sponge fingers briefly into the coffee mixture, one at a time, ensuring they are lightly soaked but still hold their shape. Arrange them neatly in the loaf tin on top of the grated chocolate layer, pressing them gently into place so you get a snug, even finish. Next, spoon over the remaining caramel ice cream and spread it carefully into a smooth, level layer using a palette knife or the back of a spoon. Take your time here to make sure it reaches all the edges, creating a clean, even middle layer that will slice beautifully once frozen. Now add the final layer: spoon the softened coffee ice cream over the top and spread it evenly, smoothing the surface as neatly as possible. This is your finishing layer, so aim for a level, polished top that will look impressive when turned out.
Step 7
Cover the tin tightly and return it to the freezer for 2-3 hours, or until completely firm and set. If you’re making it ahead, it can also be frozen overnight without any issue. When you’re ready to serve, carefully invert the tin onto a serving plate. Lift away the tin, then gently peel off the cling film to reveal the layered ice cream cake underneath. It should come out cleanly with distinct, striking layers. To finish, dust the top generously with cocoa powder for a classic, elegant touch. Slice into thick pieces and serve immediately, ideally with a drizzle of warm chocolate sauce for an extra indulgent contrast against the cold, creamy cake.