Cinder toffee recipe- amazing 30 minute snack!
You only need three simple ingredients to make this delicious homemade cinder toffee, also known as honeycomb or hokey pokey. It’s one of those magical recipes where a few everyday pantry staples come together to create something truly special — sweet, crunchy, golden, and full of that irresistible melt-in-the-mouth texture.
The best part? It’s incredibly quick and easy to make. With just less than 30 minutes of preparation time and around 10 to 30 minutes of cooking, you can whip up a whole batch of about 40 golden, bubbly pieces of cinder toffee — perfect for sharing with family and friends, or simply keeping all to yourself.
Once it’s ready and cooled, you can enjoy your cinder toffee just as it is — light, crisp, and wonderfully sweet — or get creative with how you serve it. Try dipping the pieces in smooth melted chocolate for an extra indulgent treat, crumbling it over a bowl of ice cream for a bit of crunch, or even adding it to cakes and desserts for a beautiful caramel flavor and texture.
Making cinder toffee at home is not only fun but also a bit of kitchen magic — you’ll watch the mixture bubble and rise before your eyes as the baking soda works its science, transforming sugar and syrup into a golden honeycomb of air pockets. In just a short amount of time, you’ll have a sweet, crunchy confection that looks impressive, tastes amazing, and makes the perfect homemade gift or treat.
Cinder toffee recipe- ingredient list!
Granulated sugar, 350g/12oz
Golden syrup, 175g/6oz
Two teaspoons of bicarbonate
200g/7oz bits or chips of milk chocolate (optional)
Cinder toffee recipe- step by step instruction guide!
Step 1
Begin by lining a 20 x 30 cm (8 x 12 inch) baking tin with a sheet of baking paper. Make sure to press the paper neatly into the corners and leave a little extra hanging over the edges — this will make it easier to lift out the cinder toffee once it has cooled and hardened. If you’d like, lightly grease the tin or the paper with a touch of butter or oil to help prevent sticking, though the paper alone usually does the trick. Set the prepared tin aside while you make the toffee mixture.
Step 2
Next, place the sugar and golden syrup into a large, deep saucepan. A deep pan is essential here — the mixture will bubble up dramatically once the bicarbonate of soda is added later, so give it plenty of space to expand. Set the pan over a medium heat and let the sugar begin to dissolve slowly into the syrup. Rather than stirring, gently swirl the pan from time to time to help the sugar melt evenly. Stirring can cause the mixture to crystallize, so be patient and let the heat do the work. Continue to cook until the sugar has completely dissolved and the mixture turns smooth and glossy. You’ll soon see small bubbles forming around the edges as it begins to simmer.
⚠️ Caution: Boiling sugar becomes extremely hot and can cause serious burns.
Step 3
Keep the heat steady and moderate — resist the temptation to turn it up high, as sugar can easily burn and develop a bitter taste. The key is patience here; allow the mixture to heat slowly and evenly. Avoid using a spoon to stir, as this can cause the sugar to crystallise, resulting in a grainy texture instead of smooth, golden toffee. Instead, continue to gently tilt and swirl the pan every now and then, ensuring the sugar melts evenly and the syrup remains smooth and glossy. Once the sugar has dissolved and the mixture begins to bubble gently, attach a sugar thermometer to the side of your saucepan, making sure the tip is submerged in the liquid but not touching the bottom of the pan.
Step 4
Let it cook steadily until the thermometer reads 146°C (known as the hard crack stage). At this point, the syrup will have turned a deep golden amber colour and will be ready for the magic step. As soon as it reaches the correct temperature, remove the pan from the heat immediately — the temperature can rise quickly and burn if left on the stove for even a few seconds too long. You really don't want to get this on your skin, so put on an oven glove, or better yet, two heatproof gloves. Whisk vigorously to fully incorporate the bicarbonate of soda into the sugar. The mixture will instantly expand. Using a wooden spoon or heatproof spatula, quickly and carefully scrape it into the baking tray. Give it two hours to solidify.
Step 5
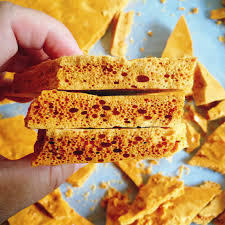
Once the cinder toffee has completely cooled and hardened — it should feel firm and crisp to the touch — it’s time for the most satisfying part! Carefully lift the slab of toffee out of the tin by holding the overhanging edges of the baking paper. Place it onto a clean surface or large chopping board. Gently peel away the baking paper from the underside of the toffee. It should come away easily, revealing a golden, bubbly honeycomb texture underneath. Now, to break it into pieces, wrap the toffee lightly in a clean tea towel (to prevent small shards from flying) and use a rolling pin or another heavy object — such as a meat mallet or the base of a sturdy saucepan — to crack it into large, rustic chunks. You can make them as big or as small as you like, depending on how you plan to serve them.
Step 6
The result is a batch of crisp, golden cinder toffee pieces that are ready to eat, dip in chocolate, or crumble over ice cream for an irresistible finishing touch. Store any leftovers in an airtight container to keep that perfect crunch. Dip the cinder toffee into melted chocolate if desired. After putting the chocolate chips in a glass bowl, microwave them for one minute. Stir and melt in the microwave for an additional 30 seconds. After dipping one side of the cinder toffee pieces into the chocolate, place them on a piece of baking paper to set.
Step 7
Cinder toffee should be kept in an airtight container.